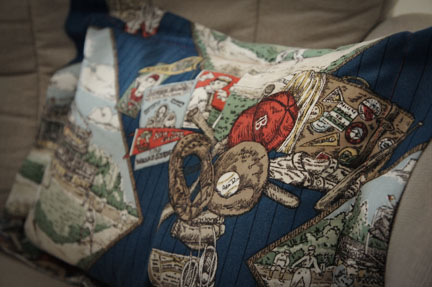
I’ve been working to finish setting up Ryder’s nursery {can I still call it that?} and, with every box I open, I’m so excited to be reintroduced to my past projects!

For both of my boys, I designed rooms that could grow with them. Dylan’s theme is vintage cowboys. Ryder’s is vintage baseball. At any point, I can make very small changes in their rooms to adjust to their ages or changes in preferences. It’s great!!

Let me give you a quick tour.

I started with a fabric that I loved and complemented it with a red ticking. I’ve long since retired the bumper, but the crib skirt will stick around for a while. I actually have enough of these fabrics to make a cute duvet for his toddler bed.


{Don’t you know the only time I can get a decent photo of my child is when I’m trying to take a photo of something else?!}

Rather than making custom treatments for his room, I purchased navy tab-top curtains and added bands of the main fabric.


I found these really great vintage penny-punch cards on eBay. They were a GREAT find {and in mint condition}! I slapped them in floating frames and… Voila! Instant art!


I purchased this dresser for $35 at an antique store. I stripped and stained the piece a dark brown and applied a crackle finish in a navy blue over the stain. I also swapped out the pulls. I LOVE the results!


I used scraps to make a fabric bunting and a few throw pillows.


I love maximum impact on a minimum budget. Don’t we all?!

Please come back tomorrow! I want to share a window treatment project that I’ve been helping a friend with this week – during our lunch hours! Gotta squeeze in the creative time whenever you can!
Have you played this before? It's so much fun what you can learn about each other through this game. And it's probably best played while sober. Just sayin'.

So here goes... my two truths and a lie...


I am a karaoke champion, which makes me a total hit at bars and parties.


I've danced on stage with the band, Survivor, to "Eye of the Tiger."


My blog is a finalist in the Blue Ribbon Blogger Awards hosted by Country Living magazine.

Which is the lie?

Number 1! I've never done karaoke in public.

Which means that Number 3 is a truth! Oh my goodness! Somebody has looked at my sweet little blog!

I'm over-the-top excited about being a finalist in the competition. The sites are being judged this week so the winners will know the outcome very soon. There is also a Reader's Choice Award part of the competition and I would love to have your support.

If you enjoy my blog, I'd be honored and humbled if you would cast your vote for my site under the "Crafts" {yes, I know what you're thinking. I do. I know.} category. Just click here and you'll find the link to vote!

I'm really in shock over all of this. 

Thank you so much for visiting and coming back. Writing my weekly posts has been a very fulfilling part of these past 9 months. I can't wait for more to come!
I'm a gypsy at heart. I thrive on change. I embrace risk. I love tackling a new challenge.

Last Monday, I began my newest journey - a Masters of Education in Higher Education Leadership. I'm equally excited and terrified. I've been out of the classroom for a while so I'm nervous about balancing everything on my plate. But I have a strong support base so I'm confident I can succeed!

But speaking of plates...

My friend, Jenn, joined me today for an especially, um, cr*fty project. A project inspired by our dear friend, Kimberly, who has recently become involved in Montessori education. We thought it would be a great idea to create table-setting place-mats to serve as learning guides for our children.

{confession}

I had to refer to a book on etiquette to be sure that I remembered the proper way to set a table! How terrible is that?


All you need for this project is:
  • Scrap fabric
  • Wonder Under
  • Contact Paper
Our original plan was to use fabric to create the utensils, but that was an epic failure. We resorted to adhesive Silhouette vinyl. Stay tuned...

Select a fabric to serve as your base. There is no particular size required. My base scrap was about 15" x 12". Jenn's was slightly smaller than that.


Select a coordinating fabric to make the plate and cup markers. Iron Wonder Under to the back of the fabric before you cut out your circles. We traced a child's plate and cup for our circles.

Iron your plate and cup circles to the base fabric. I added a zigzag stitch to our pieces to give them a more finished look.


Cut your utensils - either from scrap fabric or adhesive vinyl. I read a tip online that Wonder Under would work as well as the Silhouette interfacing for cutting fabric on the machine. Um, not quite. I wound up with a frayed, frizzy mess. The Wonder Under stuck to my carrier sheet so I now have to replace that one.

{this did not work well}
{but this was perfect!}

The vinyl worked out well for us. It was silver, which mimicked the look of real silverware. It was a happy mistake - other than the carrier sheet issue.

**sigh**

After everything is laid out on the base fabric, cut 2 pieces of contact paper to laminate the front and back of the placemat.


Our placemats turned out so cute! I plan to make a few more for the rest of my clan. Not only are they functional, but they serve as a teaching aid, too!

I look forward to sharing more projects soon! Have a wonderful week!

Things are coming together, friends! I'm getting more organized every day.

Here is a peek at my new studio space.


Hi there… Have you missed me?

I was hoping that someone would call for a search party! I’ve been buried under a pile of boxes and whatnots! I have never felt more like a hoarder.

I remembered packing up my sewing room last year – 6 boxes or so, right?? Try 35! 35 boxes of fabric, patterns, notions, organizers, tools… that doesn’t include my 5 sewing machines, dress form, and shelving.

I am ashamed.

I am purging as I’m unpacking and it feels so good! And, it feels so bad! I mean, I might eventually need this stuff…

{exiting hoarder’s mindset}

So, as it may be a while before I’m up and sewing, I’m enjoying rediscovering some of my past projects. The ones that came before the blog.

Before the move, I designed my son’s bathroom in “preppy” robots – a great theme that he won’t outgrow anytime soon. And when he does, I will only have to swap out the accessories because the color story should last through his teenage years.

I made a fun plaid shower curtain to anchor my design and built from there. I’ll have to share the curtain with you in a future post.

I used scrap fabric (denim and leftover plaid from the curtain), simple $10 frames from IKEA, and my embroidery machine to create some original artwork.

{I took these photos with my phone. Please excuse the quality!}


I first embroidered my robots onto the denim and ironed Wonder Under between my denim and plaid layers to hold the pieces in place. I then did a quick hand-stitch around the border of the denim, just for decoration.

I trimmed the plaid fabric to the dimensions of the frame insert  - the hard backside of the frame.


I used Mod Podge (my “go to” for everything!) to adhere the fabric to the frame insert and added my hardware to hang. So simple!


The most time consuming part of this project was the embroidery. It took around 30 minutes for each robot. I ran into machine trouble, too, which slowed down the process.

So, for his new bathroom, all that I’ve added is these great wall decals that I found at Michael’s on clearance. They were completely perfect in theme and color. A fun addition, don’t you think?


So, as I’m thinning out my supplies, I’d like to share some of them with you! Who’s up for a free pattern? Dealer’s choice, but never used… I’ll pick a winner at random this coming Friday. Just leave your comments below!

Thank you for coming back to see me after such a long time! I look forward to fun and creative times to share with you as my life settles back into a routine.