Has it really been more than a year since my first post about this bathroom? Even before we demolished this room, we had 6 months of searching for a contractor under our belts. Believe me, it has been a process!

When I gave my last update in December of 2013, I thought we were 5-6 weeks away from completion.

{heh-heh-heh...}

After giving up on our search for professional assistance, we resorted to DIY. My husband has learned soooo much during this process (I've learned not to ask questions about timing). I'm simply astounded by the transformation!

You've seen it a few times, but it's worth sharing the "before" pics again...


And... after!


This was the only vanity in the massive space. Pretty special, huh? Oh, and remember that door to the outside?


Check it out now!


We now have beautiful his and hers vanities, featuring antique glazed cabinetry and granite... touches of brushed nickel everywhere...

We found these great mirrors at Ikea and couldn't believe how perfect they were for the room.


We built in a water closet where the outside door used to exit. It's nice to have a little privacy in your bathroom...


...especially considering where the toilet used to be. The tiny shower has also been replaced.


Because we were doing the work ourselves, we kept the tilework simple. My only real design wish was to incorporate river rock, which turned out to be just the right touch!


The final special touches include shelving we purchased from a local Amish furniture store and gorgeous photography by my friend, Leah, of Uprooted Magnolia.


If I had to define a theme for this space, it would be "Found Things." I think that accurately describes the finishes, decorative items, and the overall process itself.

It is so nice to have full use of this bathroom again. It's been a long year!

This project actually ties up all of our major home renovation projects. We have a number of smaller projects on the list, but none that involve major construction (at this point, anyway).

We're starting on a basement update this week. I look forward to sharing that work as it begins.

I honestly don't know what we'll do if we ever finish this house.

Start over?


I don't think I've ever worked on a project for 9 months.

{Well, other than my pregnancies... the ultimate test of strength, patience, and creativity. Am I right?}

At the beginning of the year, I enrolled in a knitting class. The project? A 12-block patchwork blanket that would serve as an introduction to a variety of knitting techniques. We followed Michelle Hunter's book, Building Blocks.

Nine months later, I have the coziest, most beautiful blanket that I've ever owned.


What a fantastic experience!

More than just technique, here's what I've learned about knitting.
  1. There is no appropriate price that can be placed on a hand-knitted item. More than the materials (which aren't cheap!) there is a huge investment of time, skill, labor... I will never balk at a price tag again.


  1. A gift of something hand-knitted is an expression of love. Seriously. Thousands of stitches, constant attention to detail... More than a gift card or anything purchased "off the rack," it is something that is created intentionally, with thought and care... L.O.V.E.

  1. Knitting is soul-satisfying. It is therapeutic. It is challenging. It builds community. I'm convinced that if everyone knitted, we'd all be happier people.
Having said that, I will confess that everyone in my house is fighting over who gets to use the blanket. I've very carefully outlined the consequences of abusing it, too. 

We'll see how long that lasts.

{smile}


Since picking up knitting last fall, I quickly realized that it is an activity that I can carry with me everywhere — in the car, on the plane, to the park, to the beach...

With my busy schedule, it's become the only creative outlet that I can take advantage of these days.

When my mother taught me the basics — knit and purl — less than a year ago, I never imagined that I could create a garment. It seemed an impossible task. But... I've done it!

First, the inspiration.


This is the Tiger Lily tank by Lion Brand Yarns, a free pattern.

Because most of the work is basic knitting, I thought it would be a good project to start with. I made several attempts to start the tank before actually committing. It begins with 180 cast-on stitches. I kept running out of yarn in my cast-on attempts so I quit out of sheer frustration.

The ladies in my knitting class talked me into picking it back up. These are just the kind of friends that I need... those that hold me accountable and won't let me give up.

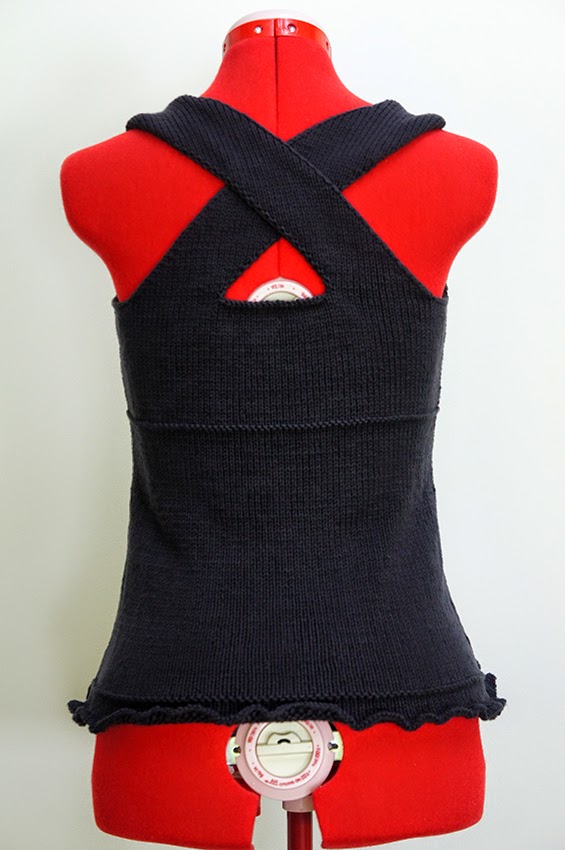
It took me a few weeks to complete, but here it is!


I think it turned out exactly as intended. The straps are supposed to softly roll. The seams line up. The decorative details are spot on. Overall, I'm very pleased! The only change that I would make (in retrospect) would be to add an inch to the length.

The best part about completing this project is the confidence that I've gained for moving forward. I have a much clearer understanding of how garments take shape.

That's a very timely lesson as my knitting class is preparing to take on a top-down sweater. As slow as I am, maybe I'll have it ready to wear by next winter!


It's been a LOOOOONNNGGGGGG time! If you've read many of my past posts, you know I place high importance on life balance. Between home and work, I've been a bit overwhelmed this year and decided the blog had to fall off the "to-do list." Just for an extended time out...

Work has continued on the house and the kitchen has been complete for a few months now. While the space configuration wasn't that bad, overall, the room was plain, very boring.


Our first priorities were paint, flooring, and new appliances.


We liked the bar area, but found it too low to be useful. We had three options: 1. buy new stools; 2. cut the legs down on our existing stools; or, 3. raise the bar height.


After much deliberation, we opted for raising the bar. My industrious husband configured the solution.


The next step was granite. To be honest, we were not pleased with our selection: Giallo Ornamental. We selected it from a granite warehouse - as we've done with our previous homes - however, it seemed too brown upon installation. We thought we'd selected something with a whiter, brighter background.

But, it's installed and it's going to stay!


Jesse's first attempt with tiling a backsplash was a huge success. And once it was installed, the granite seemed to brighten up a bit. We went with a tumbled travertine subway tile.


For a final finishing touch, Jesse installed a couple of pendants over the bar area.


What is especially genius about this project is the base that he created to hang the pendants. We've had a hard time matching the ceiling textures in this house. He knew he would have to patch a few holes with the install of this lighting. Rather than go through the trouble for results that wouldn't be perfect, he fashioned this base.

I was worried that it would look odd, but it turned out nicely.


The final item to highlight is this faucet. We installed a Delta Touch2O faucet and it is awesome! Touch it anywhere and it turns on. One of those weird things you never knew you needed...

The only problem is that I now have the same expectation for all faucets I encounter. I touch them over and over, yet they don't respond!


You'll notice that we painted the window box above the sink white. It really brightened the entire room and convinced us to continue the white trim throughout the house - the entire house...

Hazel says, "Really?! You guys are gluttons for punishment."


Why, yes. Yes, we are.


Wanna see something really gross?


Any ideas why this is so gross?


How about now?


This is what cigarette tar build-up looks like on your walls! And here's what it looks like when you start to clean it.


The previous owners of our home used one of the upstairs bathrooms as a smoking room... apparently for a LOOONNNNNGGGGGG time. This room was so saturated with smoke, we had to gut the whole thing.

But, we weren't giving up much, considering this is what it looked like.


Seriously dated cabinets, more peel-and-stick tile, and a PINK shower. Whew! What a mess!

But it sets the stage for a pretty remarkable transformation.

First, we scrubbed down the walls, grout and ceiling, painted and laid new flooring...


Next, the shower was professionally refinished as a clean, beautiful white...


It was finished off with new cabinets, lighting and fixtures, granite countertops and a few fun accents.


We have a little bit of trim work left to complete, but, all-in-all, we're counting this project as done!

It's perfect for a little boy to enjoy... or swap out the art and accessories and it's perfect for the grandparents!

{Hint-hint, Mom and Dad...}

This has been my favorite transformation to date. The hubby is finishing up a new tile backsplash in the kitchen this week and we're on the downside of our master bathroom renovation. I can't wait for that to be done! It's been a BIG job.


I absolutely love vintage shapes in skirts. I especially love flirty, knee-length skirts.

That pretty much sums up Vogue 8882.


Kellie sent me this pattern last spring and, as perfect as it is, I've been reluctant to get going with it.

The main reason? It requires a whopping five yards of fabric! That's a heckuva lot of fabric!

But, this past week, I decided to stop procrastinating and start making.

Originally, I thought that I'd use a beautiful embroidered border fabric. Clearly, that wouldn't work here because this is essentially a circle skirt.

Instead, I decided upon some pretty pink-dotted swiss that I've had in my collection of fabric for about 8 years.


I actually had five yards of this on hand... I'm not really sure why... big sale, maybe?

Anywho... It was way too shear to use on its own so I did have to make a fabric purchase - four yards of lining fabric. The lining was the only alteration that I made to this pattern.


 So, now I have nine yards of fabric in this skirt. In this knee-length skirt.

That's a heckuva lot of fabric!!

It still needs a bit more pressing, but all came together without a hitch...


...except the hem. It's lined in crinoline (which is definitely not the same as tulle, as I've been informed). Have you ever lined the hem of a garment?


I'm not saying it was hard to assemble, but the blind hem was a bit tricky to put in. Especially considering the volume of this skirt.

A little bit of puckering here and there has me debating over tearing it out and starting over.

I'm wondering if this lined hem is even necessary with this shear-ish fabric. What do you think? My inexperience is showing...

Overall, this was a simple pattern. I would definitely make it again, but with a more substantial fabric. Something with more body. I was glad to use the dotted swiss for this and free up some space in my studio.


Next on my list is Simplicity 1877, Dress B.


Once the weather warms and I can get outside, I promise to model a few of these new frocks so you can see the fit and styling of each. With snow still falling, I'm completely unmotivated!