Showing posts with label Gifts. Show all posts
In my year of healthy changes, I've become very interested in the healing properties of essential oils. I've read and researched and interviewed and experimented... it's all just very, very fascinating to me! While my collection of oils is small, I've picked up several to help with my family's sinus and skin issues, muscle aches, sleeplessness, and just overall wellbeing.

You may be thinking... the placebo effect is strong with this one...

And maybe it is, but I've been pleased with the impact they have had on our household.


So, for my handmade Christmas efforts this year, I thought it would be nice to share a gift of health with my kids' teachers and a few friends. Not to one to knock a great drinking vessel, but do they really need another mug?

My other idea was a gift card to Dunkin' Donuts. Mmmm... doughnuts are my kryptonite. They may really wish I'd given them a gift card!!

I made blends that I thought would be universally appealing - for sleep, alertness, and sinus relief. I used some recipes that I found on Hello Glow as my base and customized from there.


Good Night, Sleep Tight :: roman chamomile + lavender

WAKE UP! :: frankincense + peppermint + orange

Breathe :: eucalyptus + peppermint

I then knit up these adorable little bags to carry them. For the knitters among us, this is the first pattern that worked up on my own! I shouldn't be this proud because it's so simple, but I am.


I added a Christmas ribbon and a menu card... Voila! A simple, yet very personal little gift.


If you think this is an idea for you, you are completely welcome to my files, recipes, knitting pattern, etc. Just let me know what you'd like.

I am curious - if you are a teacher, would you use a gift like this or would it be regifted? I would love to know if I'm just thinking inside of my own bubble.

What are you crafting for Christmas this year? I'd love to hear all about it!


I don't think I will ever understand the game of football. Other than the really important plays, like running the field, kicking a goal, or scoring a touchdown, the rest is just confusing noise. My apathy for the game has always bothered my husband (as someone who takes every-single-play very personally). Imagine his delight when I began my most recent major knitting project - Michelle Hunter's Scoreboard Scarf.


Participating in this nationwide "knit along" meant that I had to stay on top of the weekly scores for my team, which also meant multiple conversations about football - or "teaching" moments - with my husband. Seriously. He was giddy.

The idea behind this scarf was just plain fun - for every point that your team scored, you knit a row in one spirit color. For every point the opposing team scored, you knit a row in a contrasting spirit color. For example:

1 touchdown + good kick = 7 rows
1 field goal  = 3 rows
1 kick-their-butts-no-one-else-even-came-close-to-scoring game = 52 rows


I divided each game with a row of purling and alternated between black and gray for the opposing teams to break up the Halloween vibe.

By the end of the season, you have a wearable document of the scoring plays.

I knew I had to make this for my best friend, Kellie, for Christmas. We both bleed orange and black for our Mercer Bears, but she's the one dedicated to sitting through cruddy weather to cheer them on. Not me. I've had my lifetime's share of bad weather in the past 3 years. Reserve for me a permanent seat in a warm, dry environment.

So, I started this scarf at the beginning of football season and wrapped it up at the 11th hour, just before Christmas. There was A LOT of knitting, knitting, knitting... and with game scores of 52-0, there was a lot of monotonous knitting.


Look at all of that orange! Go Bears!!


I'm so pleased with the outcome (not so much with these pictures), but I'm not anxious to do this again for a long time. In the words of Squints from "The Sandlot," this project took...


It's not too late to knit your own scoreboard scarf! Just head over to the Scoreboard Knit Along site for the pattern and your team's website for the season's scores and knit away! If you need help deciphering those box score summaries, just give me a holler. I'm an expert now.

**wink-wink**


My friend, Kellie, has been smitten with these Pottery Barn wine glass charms. She loves to entertain and has been on the search for this particular set for quite some time.


She shared the photo with me this weekend and I immediately suggested that we try to create something similar, but more personal.

That's how this happened...


We loaded up on goodies at the craft store... dimensional alphabet stickers, glittery scrapbook paper, jump rings, and jewelry wire. I found a bag of florist marbles at the Dollar Tree.


After laying down our stickers on the scrapbook paper, we adhered a florist marble on top of each letter with Mod Podge Dimensional Magic and let it dry overnight.


We couldn't find the right hangers for our charms so I crafted them from heavier gauge jewelry wire. I cut 2" of wire, shaped it in a circle, and bent the ends with a set of jewelry pliers.


After cutting marbles from the paper, we glued a silver pendant bail to the back of each. 

Bonus!! If you're using these for a party, you can send your guests home with the charm they choose. The addition of the bail means these will make great pendants for a necklace.


We think the results are amazing! These are glamorous, personal, and a great addition to anyone's bar ware.


We were on a roll so we kept the theme by crafting another set of wine glass charms. That post is next. Stay tuned!!

I did not enjoy Christmas "marketing" this year. I grew sick of the cries of "more, more, MORE!!!" coming from my television/radio/internet very early on. It was all just too much.

Bleh.

I have always tried to give handmade to close friends and family. My crazy schedule did not permit me to spend much time in my studio, but I was able to make a few things.

If you're looking for a few last-minute ideas, these might be just what you need!

Felted Mum + Scarf


A few months ago, I fell in love with this felted flower brooch, made and shared by Megan Reardon:


Until now, I haven't had the time (or motivation) to sit down and make one. I thought it would be perfect for my dear friend, Elly, who has stepped into the role of mother, comforter, and confidant for me since moving to Pennsylvania.

She has her own style and a flair for the unexpected accessory. I thought this brooch would look great on her.

I followed Megan's tutorial step-by-step. Materials required were:
  • high-quality felt
  • fabric glue
  • chipboard or cardboard
  • embroidery thread
And, lots of time. This is not a quick project!


I did omit the envelope on the back that Megan included on hers. Adorable, but not right for this gift. Instead, I did some simple embroidery on the back to further personalize the flower.


I actually wound up making two of these - one for Elly and one for my sweet neighbor. I paired Elly's with a black and white chevron infinity scarf and my neighbor's with a turquoise and white scarf.

The two items work together perfectly and make beautiful presentation. Great girlie gifts!


Handmade Labels


Another dear friend that I've made since arriving in Pennsylvania is Cristy. Pretty much my entire social calendar revolves around this girl. And... our hubbies really hit it off so that's an added bonus.

Talk about handmade Christmas... Cristy's fingers have been hard at work for months as she's knitted scarves and hats and dishcloths and more for all those she loves. I'm astounded at all she's accomplished!

It only seemed fitting to give her custom labels for her handmade wares.

For this project I used:
  • 100% linen fabric
  • Pellon paper-backed Wonder-Under
  • Inkjet printer

I love the natural, almost burlap, look of this linen.


I designed my art in Photoshop. The font is "Snow," available through CreativeMarket.com.


I cut a piece of Wonder Under to 8.5" x 11" and ironed it on to the back of my fabric on the bias. You can see in the photo that the fabric grain is on the diagonal. This prevents excessive fraying.

I then trimmed my fabric to the size of the Wonder Under and ran the sheet through my inkjet printer. Tip: if you're printing line art, change your printer settings to print 600 DPI or greater.

The results were exactly what I had hoped for.


I used a ruler to guide my rotary cutter as I cut out the individual labels (50 of them!). It was no quick task, but well worth the results.

When she is ready to use one, all she has to do it peel off the paper backing and iron on to her handmade item. She can finish off with an embroidered border, but it's not necessary. The bond is permanent.


I was so excited to give these small gifts because these are women who appreciate the art and personal meaning behind something handmade. It takes more thought and more care to create something from the heart.

This season is not about giving "more, more, MORE!"

Yet, in a way... it is.

Merry Christmas!


Happy New Year to you!!

And... so ends my third day in Pennsylvania.

What an adventure I've had so far!


We arrived late on Sunday night to our temporary apartment. Practically immediately, I managed to get my car stuck in 18" of snow. It stayed there, stranded, for about 48 hours!


For whatever reason, the heat didn't work in the apartment so we slept in layers and under layers with  beanies to cover our heads for warmth. It felt a bit like camping indoors...


We had a few snafus with the moving truck, ice, and huge snow drifts... but eventually, they were able to deliver our belongings to the new house.

Then, today, I managed to fall flat on my back in front of my new colleagues after slipping on some ice. I'm nursing a swollen arm as I write this.

Geez. Have I paid my dues yet?

Upon returning to my office, I had a little package with a note awaiting.

The note read... "This gift was handcrafted for you by my husband. It serves to both welcome you and remind you that springtime will come."

And inside...


It was really hard not to cry. I was so touched and this heartwarming, handmade gift could not have come at a better time.

What a blessing!

I was also greeted by this rockin' banner that our student team made for me.


Despite the challenges that the last few days have presented, I'm feeling pretty lucky!

Today was such a productive day!

If you've been following my Facebook feed, you may remember that I posted this brilliant, inspirational project a couple of weeks ago.


I am so grateful to Sew4Home.com for posting this tutorial for a microwavable neck/muscle warmer. Filled with rice, these warmers stay hot for an hour after only 2 minutes in the microwave!!

This is one of those handmade gifts that everyone can use. So... I made them for everyone in my immediate family - husband, mother, father, and both brothers.


I used pre-washed flannel for the front and super soft minky for the back. I opted to omit the rick-rack that you see in the Sew4Home examples.


My brothers are adults, but kids at heart, thus the fun monkey and monster flannel prints. Totally perfect for their personalities.

Because I was unable to finish them in time for Christmas, I completed and delivered them today. Yay!

{My husband claims it is his favorite Christmas gift. He may have learned a thing or two in 10 years of marriage.}

And, speaking of the husband, he was busy, stretching his creative muscles today, too... mending fences.

Well, just one fence. Ours.


I couldn't handle country livin' without him!

I absolutely do not consider myself a hoarder. In fact, I'm a purger. I've never even had enough stuff for a garage sale. Having said that, I do save my scraps from projects. Part of my creative mission is to be the best steward of my resources that I can be. Why waste it?

I've made so many really exciting "practical pretties" with leftover fabric. It's exciting to create something new and unplanned from materials that you already have on hand. It's like winning a prize.

As circumstances would have it, most of my fabric is in storage as we build our house. So, I'm having a lot of fun figuring out new ways to use up what I have on hand. Here's what I came up with this weekend:


Yes. It's a potholder. A set, actually. I've never made any before this attempt, but my wonderful husband bought me the sweetest book several years ago - all about potholders. I've always intended to put it to use, but hadn't until this weekend. So this "Anthropologie-worthy" set of potholders was made from nothing but leftover scraps of fabric and bumper batting (you're going to hear a lot about this massive supply of bumper batting).

I also made a set of gift tags. Punch a hole, add a ribbon, tie on a gift bag, and you've got a present attached to your present. Who would throw one of these away? They are too precious.


I have 1,000,000+ ideas for things to do with my treasured collection of scraps. Do you hang on to yours? What are some projects that you have planned? Please share with us all!

I'll happily send this set of 4 gift tags along to the person who comments with the most creative use for fabric scraps.

Wishing you a week full of blessings and happiness!
So, I must remind you that my proudest point for this whole project is that I used materials that I already had on hand or found. I used a scrap of fabric, some baby bumper batting, and chipboard that I found in a box of envelopes at work!

As I was attempting to document my work in photos, I realized I stink at documenting a project in photos. So... I hope my simple illustrations will answer any questions that you might have. If not, please contact me.

  1. Find something substantial to make your covers out of! Chipboard is a heavy duty cardboard that you can pick up at your local print shop. You can also use gator board, regular ole cardboard, or foam core. My piece of chipboard just happened to be 12" x 9" so I cut it into 2 pieces that measured 5 3/4" by 9" (for the front and back) and one strip that measured 1/2" by 9" for the spine. I used an x-acto knife and a ruler to cut the board. 
  2. Cut 2 pieces of low-loft batting the same size at your cover pieces.
  3. Use a hot glue gun to affix the batting to the cover cardboard pieces.
  4. Cut 2 pieces of fabric that measure 14" by 10". Decide which piece will line the inside of your case.
  5. Cut 2 pieces of elastic - 6" each. I used a 1/2" wide elastic, but pretty much any size will do. Pin the elastic in place on the right side of your inside lining. I placed the top elastic 3" in and down from the top right hand corner and 3" in and up from the left hand corner. Baste in place. (Basting is a simple, loose stitch.)
  6. Create the closure. Cut a piece of fabric 3" x 6." Fold in half, lengthwise, with right side together and stitch with a 1/2" hem to create a tube that is 1" by 6". Turn right side out, tuck one end in approximately 1/4" and press flat.
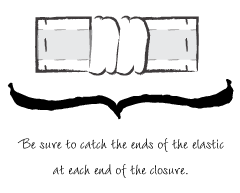
  7. Insert a 3" piece of elastic and sew each end even with the ends of the fabric tube. The fabric will gather in the middle. See the diagram to the right. Iron on a piece of fusible velcro to the end that is tucked under.
  8. Place the right sides of the fabric together. Pin the closure in place between the fabric panels, matching up the raw edges of the fabric panels. (I placed my closure midway down the right side of the fabric cover). See photograph below. Sew panels together on the top and sides, leaving the bottom edge open. Turn right side out and press with an iron.
  9. Iron on the opposite side of the fusible velcro in place on the front of the cover.
  10. Turn the bottom edge of the cover inside 1/4" and press.
  11. Create a 1" pocket for the spine by sewing 2 straight seams 1/2" on either side of the center of your fabric cover.
  12. Insert your batting-covered panels and the spine into the cover and slipstitch the bottom edge closed.
Congrats! You're done! I hope it was easier for you to make than it was for me to explain the steps. It should take less than 2 hours to make.

In closing, I leave you with these thoughts. Handmade isn't perfect. It's personal. Do something nice for someone today - just because! The happiness it brings will linger for a long time.

Wishes for peace and happiness! Come back soon!