Showing posts with label Holidays. Show all posts
If you'd ever told me that a performance fabric could look this chic, I would have thought, "Yeah. Okay. Not on me..."

But then I met supplex...


If we're connected on Instagram, then you know 2018 has been a year of firsts for me. And many of those firsts have been sewing-related. I made a bikini... I made activewear... I made underwear... I made outerwear! So many garments that I never even thought about making before. All inspired by the fabrics that I've found at Phee and the drive to stretch my self-imposed boundaries.

So, when I saw this peacock supplex, I knew I had to cut into it! So often, when you work with knits, you wrestle with the texture of the fabric fighting against you. It can be too stretchy. It can be slippery. It can be too thin. It can have poor recovery.


Not supplex.

This dreamy fabric is heavy enough to make any garment - pants, dresses, jackets... even sports bras! I went for a pattern that has been in my collection for some time, the Wiggle Dress by Patterns for Pirates.

All-in-all, this dress came together beautifully. The supplex was a dream to cut and sew. I struggled a bit with the zipper and ultimately wound up hand-sewing it in. That additional effort took this very form-fitting dress from looking cheap to chic.


I tend to be very self-conscious and I was very worried about showing off the ten pounds that I've gained this year! But, I have to say that I feel pretty sexy in this dress!

The supplex has a great compression factor and helps to smooth out some of the areas that I was most concerned about. Whether or not I actually find the confidence to make it out of the house is another matter.


But should the occasion arise this holiday season, I am party ready!
After all of these years of making, I have never sewn a costume for myself. I've just never had much of a reason to dress up on Halloween or for any other event. However, this year, my brother nearly had me convinced to attend DragonCon in Atlanta. I wasn't able to attend, but the invitation started my brain thinking about creative costumes.


I'm personally much too practical to invest my time and energy into garments that can only be worn once or twice per year so I began searching for ideas that I could incorporate in my regular routine.

That's when I remembered Pearl, from a Cartoon Network show called "Steven Universe." My kids used to watch it... I have no personal affinity for the show or the character. I felt, though, that her character could easily translate into multifunctional additions to my own wardrobe.


{Not only that, her character seems pretty high on anxiety... she may actually be modeled after me!}

All I needed to sew was a cute peplum top and a pair of tangerine shorties. I matched it with a pink wig and socks, both purchased from Amazon, and attached a little yellow felt star with double-sided fashion tape.

I made the top by mashing together the Made for Mermaids Mama Fiona and Mama Joy. I gathered the peplum, rather than pleating. I self-drafted the funnel neck by increasing the neck binding by three times the width of the pattern.


I used a dreamy circular knit from Phee Fabrics for the top. It was my first experience with the fabric that everyone adores. And, I have to agree, not only does it feel amazing, it worked up like a dream. It is the perfect fabric for activewear and daily wear alike!


The pants I'm wearing here are also me-made... Vogue 1517 by Anne Klein. These pants really deserve their own post. MAJOR learning curve to share!


For the shorties, I used the Patterns for Pirates Peg Legs pattern and lengthened the inseam by two inches. I actually made these twice... the first time with a gusset. And, holy moly! The fit was so terrible on me that I was embarrassed to look at myself in the mirror. Thank the sewing gods that I had just enough fabric to complete a second pair - sans gusset!


I used a gorgeous nylon/spandex tricot in tangerine for the shorties. This is the perfect performance fabric! As a runner, I will definitely get a lot of use out of these cuties! This was my second project using tricot and it won't be my last! Word of advice when making these shorties with tricot - size up, ladies! This is a compression fabric.


My last accessory was my very own little Steven Universe. He was super excited to channel the energy of his character and decided that bubbles were a must have in our quick photo shoot.


I really couldn't be more pleased with the outcome of this month's sewing challenge. I loved the opportunity to think creatively about how to assemble a costume that will blend into the everyday.

And, who knows, it may get to make an appearance at DragonCon 2019.

What's on your cutting table for Halloween this year? Please tell me all about it!


I did not enjoy Christmas "marketing" this year. I grew sick of the cries of "more, more, MORE!!!" coming from my television/radio/internet very early on. It was all just too much.

Bleh.

I have always tried to give handmade to close friends and family. My crazy schedule did not permit me to spend much time in my studio, but I was able to make a few things.

If you're looking for a few last-minute ideas, these might be just what you need!

Felted Mum + Scarf


A few months ago, I fell in love with this felted flower brooch, made and shared by Megan Reardon:


Until now, I haven't had the time (or motivation) to sit down and make one. I thought it would be perfect for my dear friend, Elly, who has stepped into the role of mother, comforter, and confidant for me since moving to Pennsylvania.

She has her own style and a flair for the unexpected accessory. I thought this brooch would look great on her.

I followed Megan's tutorial step-by-step. Materials required were:
  • high-quality felt
  • fabric glue
  • chipboard or cardboard
  • embroidery thread
And, lots of time. This is not a quick project!


I did omit the envelope on the back that Megan included on hers. Adorable, but not right for this gift. Instead, I did some simple embroidery on the back to further personalize the flower.


I actually wound up making two of these - one for Elly and one for my sweet neighbor. I paired Elly's with a black and white chevron infinity scarf and my neighbor's with a turquoise and white scarf.

The two items work together perfectly and make beautiful presentation. Great girlie gifts!


Handmade Labels


Another dear friend that I've made since arriving in Pennsylvania is Cristy. Pretty much my entire social calendar revolves around this girl. And... our hubbies really hit it off so that's an added bonus.

Talk about handmade Christmas... Cristy's fingers have been hard at work for months as she's knitted scarves and hats and dishcloths and more for all those she loves. I'm astounded at all she's accomplished!

It only seemed fitting to give her custom labels for her handmade wares.

For this project I used:
  • 100% linen fabric
  • Pellon paper-backed Wonder-Under
  • Inkjet printer

I love the natural, almost burlap, look of this linen.


I designed my art in Photoshop. The font is "Snow," available through CreativeMarket.com.


I cut a piece of Wonder Under to 8.5" x 11" and ironed it on to the back of my fabric on the bias. You can see in the photo that the fabric grain is on the diagonal. This prevents excessive fraying.

I then trimmed my fabric to the size of the Wonder Under and ran the sheet through my inkjet printer. Tip: if you're printing line art, change your printer settings to print 600 DPI or greater.

The results were exactly what I had hoped for.


I used a ruler to guide my rotary cutter as I cut out the individual labels (50 of them!). It was no quick task, but well worth the results.

When she is ready to use one, all she has to do it peel off the paper backing and iron on to her handmade item. She can finish off with an embroidered border, but it's not necessary. The bond is permanent.


I was so excited to give these small gifts because these are women who appreciate the art and personal meaning behind something handmade. It takes more thought and more care to create something from the heart.

This season is not about giving "more, more, MORE!"

Yet, in a way... it is.

Merry Christmas!


I don't really decorate for Valentine's Day, but these little mailboxes were too hard to pass up for $1 at Target. They are so cute! 

It was one of those mental commercial moments... do you have those? I suddenly saw images of these little boxes lining my mantel and the kiddos' happy faces as they each open their own little mailbox to find it filled with treasures.

{Who am I to deny them that Hallmark moment?}

Of course, they had to be dressed up a bit! Silhouette vinyl and vintage fabric was all I needed to gussy them up just a bit.


Isn't this fabric precious? I've wanted to use it for ages so I was thrilled it fit in with this project.


I first cut the decals using my Silhouette. I'm happy to share the studio files with you if you have a Silhouette. Just message me at rachelhgarza{at}gmail{dot}com.


I cut the fabric to back the letters and...


Added the decals to the mailboxes.


I love how the fabric gives the decals a soft, dimensional look. Such a nice touch!


Like it? Pin It

This was a really quick and simple project, which is about all I have time for these days. I'm deep in the weeds with my graduate studies this semester so I have less time to devote to my creative "to-do" list! 

Please bear with me as I surge through the next couple of weeks.

Happy Valentine's Day week, my friends!
So, I discovered this week that many of my ornaments did not survive the move. I didn't know they could break into so many pieces! It's almost as though they disintegrated. 

I now clearly remember one of the movers dropping my ornament boxes and scrambling to put everything back together. There were so many things going on at that moment that I filed it away, under "Let It Go."

Really. It's disappointing, but it's no big deal.

It may {or may not} surprise you to know that there is no real rhyme or reason to my decorating for Christmas.

I decorate with things that I like. And, I realize that is okay. There is nothing wrong with keeping it simple and surrounding yourself with things that inspire you, even if they don't coordinate. 

I call my strategy, "Vignette Design." {Because that almost makes it seem legit.}


{Great Target finds!}

I did, however, want to decorate my staircase this year. It is one of my favorite features of the house.

I started with a new wreath for the landing.


I added some simple ribbon flowers to a grapevine form. They were so simple to make. I purchased wired ribbon, which made manipulating the shapes of the flowers even easier.

Here's the "How To."


Cut your length of ribbon. The longer the ribbon, the bigger the flower.

Begin gathering one side of your ribbon by pulling the wire. You will want to pull the wire on both ends so you can gather your ribbon in the middle. This will give you enough wire on both ends to tie the flower into place.


Coil your ribbon into a spiral.


And tie both ends together underneath the flower.


I tied some of my flowers to the wreath with wire. I used hot glue for others to get them in a tight bunch on the form. There is no wrong way to do this. Use whatever method is most comfortable for you.


I added a few more ribbon details to my wreath.


The hardest part about making this wreath was stopping myself from going overboard.

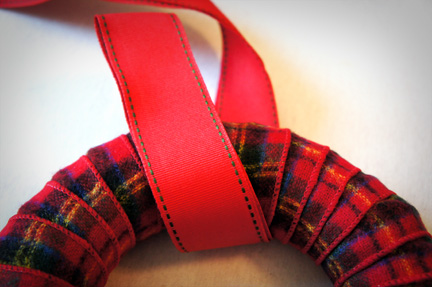
For the banister, I wrapped 8" straw wreath forms with the same ribbon.

{I just love this flannel ribbon that I found at Michaels!}

Here's one way to create a simple ribbon hanger for a wreath.

Take a long length of ribbon and fold it in half.

Bring the loop around front the wreath like this:


Take the tails of the ribbon and tie in front of the loop.


Tie a simple bow and you're done!


Here's how my stairs turned out.


It's simple, but it makes me smile. That's what it's all about, right?

**smile**

How are your Christmas preparations going? Are you doing anything special or new this year to celebrate the holidays?