I just dropped Kellie off at the airport.

**tear and sniff**

We had such a great weekend... sightseeing, shopping, eating, and... crafting.

Yes, I suckered her into a crafting session. I've missed having creative company! A visit from my bestie was the perfect crafting jumpstart that I needed.

I've had this idea floating in my head for a while and was waiting for the right time to give it a try - "enameled" Shrinky Dink pinwheel charms.

Isn't it adorable?


I love pinwheels. I "pin" them as often as I see them. They are such happy little things!

Look at these beauties.


And, do you remember my March Winds wreath?


It's still hanging in my boys' playroom. Such a happy sight!

But I digress... back to the tutorial.

We would both label this project a challenge and a success (and I have the burns to prove it!).

Here's how we made our charms.

Start with a 2" x 2" square of Shrinky Dink material. Cut four slits from the exterior corners to the near-middle of the square.


Punch a hole in one corner.


Heat your oven and shrink per product directions.

Here's where it gets tricky... and dangerous...

Right as your plastic lays flat, open the oven and begin to fold in the edges towards the center as shown below. You have to work very quickly or the plastic will become to hard to fold into shape.

I burned myself several times during our various trials - so, trust me, it's dangerous work!


We made several attempts before figuring out the proper technique for working with the plastic.


File the tips of the pinwheel just a bit because the edges are very sharp.


Paint your piece with nail polish just as you would a manicure - several thin coats and a top coat. Allow each to dry thoroughly.


We inserted toothpicks into our punched hole to make painting all sides easier.


Add a jump ring and you're done!


Now that we've worked through this project, I can think of 1,000 ways to make it even more creative with painting techniques. I'm thinking polka dots... glitter... stripes... ahhhhhh!!!! There is so much fun to be had!

I'm tempted to try more 3D Shrinky Dink projects after our success with this one. Any ideas? Send them my way, please!


I love my back deck. I have nothing negative to say about this space.

{You were beginning to think that I do nothing but complain. Am I right?}

It's so spacious and inviting. And now that it's warm, we are practically living back here! My 3-year-old says dinner is always a "picnic."


What could need improvement?

Well... other than just a thorough power washin', a few flowers for these sad planters were in order.


So, we've spent the last few days pruning and planting.

What an improvement!!


I honestly can't remember the last time we bought this many annuals. They are so beautiful and happy!

Coleus is one of my favorite planter additions. It comes in so many pretty hues and complements just about everything.


There is also a beautiful and very large Japanese maple that provides a shady spot to sit beneath all day long. It's just gorgeous!


My appreciation for spring and warm, sunny weather has reached a whole new level. I don't want to waste a single minute indoors.

I hope that the weather is beautiful and life is peaceful wherever you are.

I'm so excited to have a very special visitor flying in to spend Memorial Day Weekend with me...

My dearest friend, Kellie!!!


We've been practically joined at the hip for the past seven years and I've missed her so, SOOOOO much since the move.

There is nothing like the expectation of company to kick all of your home improvement projects into high gear - thus the overwhelming number of house-related posts that I've shared lately. The house won't be perfect, but, hey, we all know how I feel about perfection.

**smile**

The guest bedroom is finished {yay!} so at least she will have a nice place to rest.


Now, to remember all of the little details to make her stay more comfortable.

Harriet Withycombe for SocialMosters.org has a great checklist for preparing your home for overnight guests:


After hours of traveling, all you want to do when you arrive at your destination is unwind in a comfortable room. Whether you're expecting houseguests from near or far, it's imperative you afford them the same hospitality you appreciate. Channel your inner Martha Stewart by preparing your guest room with these six special touches:

Crisp Bedding

While many outfit their spare bedrooms with bedding cast-offs from master bedrooms past, if it's in your budget, splurge on a new duvet and set of cotton sheets. Many big-name retailers such as Macy's have holiday furniture and bedding sales including large selections of mattress brands and comforters to choose from. Discerning shoppers can usually find good deals by visiting department stores and shopping online.

Extra Pillows and Blankets

MarthaStewart.com experts recommend making up a double or queen-sized bed with four pillows, two firm and two soft, to accommodate any guests' preferences. Add a few accent pillows, which can double as support for those who want to read or use an iPad in bed. For blankets, make up the bed with one light blanket and one heavier one, and fold a lightweight throw at the foot of the bed or over a reading chair.

Ample Closet Space

For many, the guest room closet is a catch-all for wardrobe overflow and out-of-season garb. Clear some space here so guests have a place to hang their things. Stock the closet with a dozen high-quality hangers (not the wiry souvenirs from the dry cleaner) to hold everything from heavy winter coats to trousers and dresses. Clean out a dresser drawer or two as well.

Charging Station

Don't force your guests to crawl around the room or move furniture to charge their mobile phones and other tech gadgets. Seasoned hosts at Woman's Day magazine suggest adding a power strip in a convenient spot, such as next to the bed, for easy-access charging.

Clear the Clutter

Less is more when it comes to framed photos and trinkets in the guest room. Streamline the decorative details to evoke a soothing sense of comfort – too much “stuff” will likely make your guests feel smothered.

Don't Forget the Bathroom

Guest preparation isn't limited to the bedroom; a great host must consider the bathroom as well. Provide ample space in the guest bathroom for houseguests to unpack their personal items. Leave out a stack of freshly laundered towels and a basket of spare toiletry items in case your guests forget anything. Include items such as:
  • Shampoo and conditioner
  • Body lotion
  • Shower gel
  • A bar of soap
  • Toothpaste
  • Razor
  • Q-Tips
  • Cotton balls

Your guests will appreciate the advance planning for their stay. After all, comfortable and well-rested guests make the visit more pleasant for everyone!


It's nice to have these little reminders to take the stress out of preparing for company. I especially love the idea of supplying a charging station. What a nice extra step that says, "I'm so happy that you're here! Relax and let me take care of you for a few days."

If you'll humor me with some more house updates, I have a few more coming - including my laundry renovation, my back deck (pretty flowers!), and... we're starting on the bamboo flooring tonight!

I hope that your week is off to a great start!

We finally finished up our downstairs powder room this weekend.

Imagine, if you will, a rosy pink pedestal sink and toilet with a scalloped pink detail on both the sink backsplash and tank cover.


Very pink and very dated. Bleh.

Everything came out - the fixtures, the flooring, the baseboard heat unit.


After a few coats of paint, all new fixtures and flooring, and a few brushed nickel accents, we have a totally new space!


It's a tough room to photograph because it's such a tight space...


...but it's astounding how much larger the room feels!


I'm still working on styling the room. It's not an especially creative or inspiring space. I'm notorious for overdoing it, but right now, it feels so sparse.

{thinking... thinking...}


We're powering through as many projects as we can right now because company's coming!! I'm ridiculously excited to have a very special visitor coming to see me on Friday for the long weekend.

More to come on that in my next post.

**big grin**

I couldn't wait another minute! My studio has been completely dismantled so I set up camp in the dining room.

I just had to sew!

Rather than picking up one of my outstanding projects, I decided to tackle a "Very Easy" Vogue pattern that my sweet friend sent me for my birthday.

Vogue and Very Easy... that's an oxymoron, right?

 
I've been holding on to the perfect fabric. A lovely crepe de chine in a coral and neutral tribal print.


I absolutely love, love, love the way it turned out!


The only major change I made was omitting the pockets. This is such a light, sheer-ish fabric and I just didn't think they were necessary.


So, was it easy? Well, fairly easy... I struggled with the slippery fabric more than anything. The neckline gave me some trouble.

Necklines are always my Kryptonite. 

And darts. Lawd, I hate darts...

I would say the weirdest part about this pattern is the back of the skirt. It is in two pieces with a center seam. I just think that's a bit unnecessary. There is no functional reason that it should be cut into two pieces. One piece cut on the fold would have worked perfectly. 

Maybe Vogue was concerned about fabric conservation?

I used a French seam down the back of the skirt because of the high-low hem. I didn't want a serger seam shining through. The French seam gives it a nice polished finish.


Easy, breezy, cute, and very me!

I have lots of house updates to share with you this weekend. The sun is shining, the temps are warm, and we're finding ourselves more "at home" everyday.

Sending love and hugs! Have a happy Thursday!


Our second guest bedroom is lacking an identity.

Ultimately, I'd like it to have a more masculine feel. I especially LOVE this Swiss Army blanket-inspired room that Cooper Boone featured on his blog, "Cooper's Table."


It's strong, masculine, and... simple!

As a start, I've set up a full-size bed with a few accessories. I guess you could call it, "The Land of Cast Off Furniture."

I sorted through all of the bedding that we've accumulated over the years and found a queen set that will temporarily fit the bill - until I gather my thoughts and inspiration for the space.

I thought I'd share with you how I adjusted the queen bedskirt to fit the full bed. It's a no sew solution that is completely non-committal!

Does it get any better?

Here's the before.


Continue to pinch, fold, and pin the fabric down the length of the skirt.


And here's the after!


It's now a perfect fit!

This solution worked especially well with this style of bedskirt. The gathers help to disguise the folds at the foot of the bed.

I hope this is helpful! I'm always eager to use what I already have on hand. I was so pleased to customize the fit without sewing a seam!

I hope your week is off to a great start!


Just as quickly as I set up my studio in the new house, my husband threw himself full-force into redoing all of the flooring. Every square foot of it.

He's now laid temporary claim to my creative space as a catch-all for his tools and equipment.

How can I complain? The renovations are already amazing.

We've decided if we had a show on HGTV, it would be called, "This Ugly House." I've mentioned some of the oddities of this particular home in a few past posts.

So, in the absence of fun, engaging projects to share with you, I thought I'd begin revealing the work we've done.

Starting with the first of two guest bedrooms.

This room started drab and bleh. New carpet, paint, lighting, and lots of very personal, meaningful, girly accessories have now transformed the space.


We painted the walls a lovely grey, which suddenly turned almost lilac when I added the bedding! But, it's still a lovely and serene color.


If the art arrangement above looks familiar, it's because I replicated what I did in my previous home. Do you find yourself recreating beloved spaces when you move?

I made some simple panels from a heavy decorator fabric that I've had for ages. It already had a scalloped edge so all I had to do was hem the top and bottoms.

It may be weird, but I only hung one panel per window. The room is rather small and I was afraid that anything heavier would be too much.


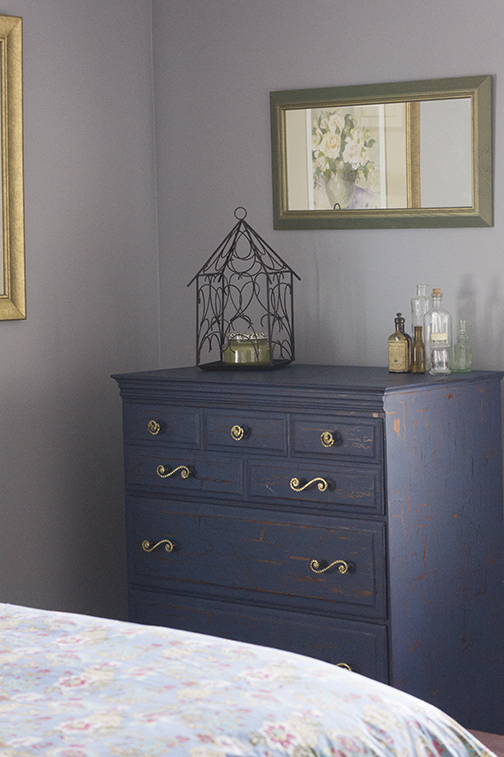
The dresser is a piece that I painted myself. I keep reassigning it in my home. I bought it in college {I think?}. I used it for both of my boys in their nurseries. It now fits in perfectly in this eclectic room.


Among the accessories that I'm using is part of my collection of old bottles {although I think I stole some of these from my mother's collection. Sorry, mom!}. It's so hard for me to resist an old bottle! They have a history of their own, don't they?


I've also hung some of my grandmother's artwork. She painted the poppies in the first photo and also the ceramic cameo below. It's weathered and old and just perfect for this room.


And, finally, to welcome our guests, some of my childhood lovies. They love being the welcoming committee.


The rest of the house may be a total disaster, but this room is ready for company!