I keep a notebook handy at all times. If I'm inspired by something that I read or see, I add it to my list of projects that I hope to get to someday. We'll talk more about the notebook as time goes along. It's something I can't do without!

So... confession time. I watch a LOT of Disney tween shows with my son. He's at that age where Max and Ruby or Kipper the Dog just don't cut it anymore. We started innocently enough with Phineus and Ferb (arguably the best cartoon of all time) and we've slowly moved into Suite Life on Deck and Sonny with a Chance. Terrible, I know.

Hang with me here. I'm going somewhere with this.

Several months ago, we were watching a show - Good Luck Charlie - when I saw the most fantastic rug! It was made out of blue jeans. Instantly, said rug was on the list.

So, yesterday I went shopping for the goods. My mom and I hit Goodwill, where I found the most fantastic jeans for my project - all for around $5 each! I have never been so delighted to own urban-wear pants. The pockets are amazing!


I also found this really cool belt buckle, a leather cuff, a jacket, and a dresser that I had to have. I'd forgotten how great thrift store shopping can be!


I plan to make the rug for my boys' playroom in the new house. Dimensions will be 8' x 10'. My idea for the layout is structured, rather than the free form design of the inspiration piece. Something like the diagram I've sketched out below, but better (I hope!).


Should you decide to pursue a similar project, I would recommend purchasing the largest jeans you can buy - more fabric for the money!

This project will take some time to complete, but I was too excited to share my plans!

What are you working on this week?
Remember my scrappy potholders from last weekend? I made too much bias tape for the edges of the potholders - about 24" too much. As I was cleaning up today, I saw the scrap and thought, "Flowers!" And not just because it was a floral print...

Fabric flowers are on everything right now - clothing, hair accessories, even jewelry! I'd never made them before, but the concept seemed simple enough. So, I gave it a quick try.

First, I cut my bias tape into three 7" strips - nothing scientific about the measurement. I wanted to make six flowers so that's how I divided the length of fabric.


I cut each strip in half, lengthwise.


I sewed a loose basting stitch along the folded side of the strip.


I then pulled one thread on either side and started gathering the strip towards the middle of the length.


I kept gathering until the whole length wound into a tight curl.


I tied both ends of the thread together to hold the flower's shape.


Aren't they sweet? I have big plans for this tiny little bouquet. Lots of them, actually. I need a little more time to narrow it down.

Headband? Brooch? T-shirt? What would you use them for? Please post and share your ideas!

By the way, I have a big project on the horizon that I can't wait to tell you about. Stay tuned. More details will be in my next post!

I absolutely do not consider myself a hoarder. In fact, I'm a purger. I've never even had enough stuff for a garage sale. Having said that, I do save my scraps from projects. Part of my creative mission is to be the best steward of my resources that I can be. Why waste it?

I've made so many really exciting "practical pretties" with leftover fabric. It's exciting to create something new and unplanned from materials that you already have on hand. It's like winning a prize.

As circumstances would have it, most of my fabric is in storage as we build our house. So, I'm having a lot of fun figuring out new ways to use up what I have on hand. Here's what I came up with this weekend:


Yes. It's a potholder. A set, actually. I've never made any before this attempt, but my wonderful husband bought me the sweetest book several years ago - all about potholders. I've always intended to put it to use, but hadn't until this weekend. So this "Anthropologie-worthy" set of potholders was made from nothing but leftover scraps of fabric and bumper batting (you're going to hear a lot about this massive supply of bumper batting).

I also made a set of gift tags. Punch a hole, add a ribbon, tie on a gift bag, and you've got a present attached to your present. Who would throw one of these away? They are too precious.


I have 1,000,000+ ideas for things to do with my treasured collection of scraps. Do you hang on to yours? What are some projects that you have planned? Please share with us all!

I'll happily send this set of 4 gift tags along to the person who comments with the most creative use for fabric scraps.

Wishing you a week full of blessings and happiness!
Have you ever come across a diary that you started years ago, but ultimately abandoned? When you were writing down your thoughts, they seemed so relevant and well-formed. When you read them now, it's just ridiculous from top to bottom, right? This actually terrifies me about blogging.

Having said that, when I made my announcement 2 days ago that I was launching this blog, I didn't know what to expect. This is something that I have planned to do for a couple of years now, but I could never get it going. I've received a few comments - all very strong and supportive - and I can see through analytics that nearly 100 people visited this site on Day One! So a hearty "Thank You!" goes out to everyone that took the time to click through.

So, Lesson #1:While I'm not new to blogging, I am new to documenting a "how-to." Wow! Who would have guessed it would be so difficult? I hope to go back and refine the past post to better clarify each step. And, in the future, I hope to hone my skills as a creative blogger.

Lesson #2: It's a heck of a lot harder to take photographs while you work. In fact, unless you have someone helping, you can't take photographs while you work! This problem still needs a solution.

Lesson #3: Photos taken in natural light turn out so much nicer than ones taken indoors at night (see Post #1 vs Post #2 below). This is not a revelation to me. I actually minored in photography in college. But, I now know to plan my project photography for Saturday and Sunday - days that I'm actually home while it's light outside.

A lot more to learn and a lot more to come!

Wishing you peace and happiness until next time!
So, I must remind you that my proudest point for this whole project is that I used materials that I already had on hand or found. I used a scrap of fabric, some baby bumper batting, and chipboard that I found in a box of envelopes at work!

As I was attempting to document my work in photos, I realized I stink at documenting a project in photos. So... I hope my simple illustrations will answer any questions that you might have. If not, please contact me.

  1. Find something substantial to make your covers out of! Chipboard is a heavy duty cardboard that you can pick up at your local print shop. You can also use gator board, regular ole cardboard, or foam core. My piece of chipboard just happened to be 12" x 9" so I cut it into 2 pieces that measured 5 3/4" by 9" (for the front and back) and one strip that measured 1/2" by 9" for the spine. I used an x-acto knife and a ruler to cut the board. 
  2. Cut 2 pieces of low-loft batting the same size at your cover pieces.
  3. Use a hot glue gun to affix the batting to the cover cardboard pieces.
  4. Cut 2 pieces of fabric that measure 14" by 10". Decide which piece will line the inside of your case.
  5. Cut 2 pieces of elastic - 6" each. I used a 1/2" wide elastic, but pretty much any size will do. Pin the elastic in place on the right side of your inside lining. I placed the top elastic 3" in and down from the top right hand corner and 3" in and up from the left hand corner. Baste in place. (Basting is a simple, loose stitch.)
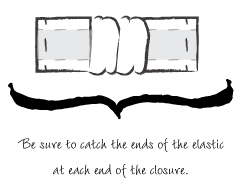
  6. Create the closure. Cut a piece of fabric 3" x 6." Fold in half, lengthwise, with right side together and stitch with a 1/2" hem to create a tube that is 1" by 6". Turn right side out, tuck one end in approximately 1/4" and press flat.
  7. Insert a 3" piece of elastic and sew each end even with the ends of the fabric tube. The fabric will gather in the middle. See the diagram to the right. Iron on a piece of fusible velcro to the end that is tucked under.
  8. Place the right sides of the fabric together. Pin the closure in place between the fabric panels, matching up the raw edges of the fabric panels. (I placed my closure midway down the right side of the fabric cover). See photograph below. Sew panels together on the top and sides, leaving the bottom edge open. Turn right side out and press with an iron.
  9. Iron on the opposite side of the fusible velcro in place on the front of the cover.
  10. Turn the bottom edge of the cover inside 1/4" and press.
  11. Create a 1" pocket for the spine by sewing 2 straight seams 1/2" on either side of the center of your fabric cover.
  12. Insert your batting-covered panels and the spine into the cover and slipstitch the bottom edge closed.
Congrats! You're done! I hope it was easier for you to make than it was for me to explain the steps. It should take less than 2 hours to make.

In closing, I leave you with these thoughts. Handmade isn't perfect. It's personal. Do something nice for someone today - just because! The happiness it brings will linger for a long time.

Wishes for peace and happiness! Come back soon!


My mother was considering a case for her Kindle. Why purchase a one, when you can make one that is designed just for you?


I used a scrap of fabric, chip board, batting, and elastic. All materials that I already had on hand.

My next post will include detailed instructions on how to make a eReader case for yourself.