As I was attempting to document my work in photos, I realized I stink at documenting a project in photos. So... I hope my simple illustrations will answer any questions that you might have. If not, please contact me.
- Find something substantial to make your covers out of! Chipboard is a heavy duty cardboard that you can pick up at your local print shop. You can also use gator board, regular ole cardboard, or foam core. My piece of chipboard just happened to be 12" x 9" so I cut it into 2 pieces that measured 5 3/4" by 9" (for the front and back) and one strip that measured 1/2" by 9" for the spine. I used an x-acto knife and a ruler to cut the board.
- Cut 2 pieces of low-loft batting the same size at your cover pieces.
- Use a hot glue gun to affix the batting to the cover cardboard pieces.
- Cut 2 pieces of fabric that measure 14" by 10". Decide which piece will line the inside of your case.
- Cut 2 pieces of elastic - 6" each. I used a 1/2" wide elastic, but pretty much any size will do. Pin the elastic in place on the right side of your inside lining. I placed the top elastic 3" in and down from the top right hand corner and 3" in and up from the left hand corner. Baste in place. (Basting is a simple, loose stitch.)
- Create the closure. Cut a piece of fabric 3" x 6." Fold in half, lengthwise, with right side together and stitch with a 1/2" hem to create a tube that is 1" by 6". Turn right side out, tuck one end in approximately 1/4" and press flat.
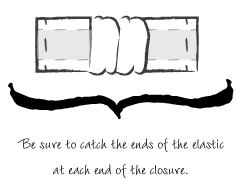
- Insert a 3" piece of elastic and sew each end even with the ends of the fabric tube. The fabric will gather in the middle. See the diagram to the right. Iron on a piece of fusible velcro to the end that is tucked under.
- Place the right sides of the fabric together. Pin the closure in place between the fabric panels, matching up the raw edges of the fabric panels. (I placed my closure midway down the right side of the fabric cover). See photograph below. Sew panels together on the top and sides, leaving the bottom edge open. Turn right side out and press with an iron.
- Iron on the opposite side of the fusible velcro in place on the front of the cover.
- Turn the bottom edge of the cover inside 1/4" and press.
- Create a 1" pocket for the spine by sewing 2 straight seams 1/2" on either side of the center of your fabric cover.
- Insert your batting-covered panels and the spine into the cover and slipstitch the bottom edge closed.
Congrats! You're done! I hope it was easier for you to make than it was for me to explain the steps. It should take less than 2 hours to make.
In closing, I leave you with these thoughts. Handmade isn't perfect. It's personal. Do something nice for someone today - just because! The happiness it brings will linger for a long time.


