I haven’t missed my long hair for one minute since chopping it all off. I feel like I can finally do fun things with what’s there!

I’ve wanted to make some fun headbands for a while now, but just haven’t gotten around to it until this weekend.

And I love creating multipurpose accessories so I put some thought into how I might create a “slide” that could transfer from headband to barrette to brooch.

I dug through my scrap bag to get the supplies that I needed, grabbed my glue gun and got to work.


I used this tutorial, via Cherry Street Cottage, to make my flowers. I made one large and two small flowers. I also made a little ruffle with a fabric scrap. I used a basting stitch to gather the ruffle.


Once I had my components created, I cut 2 small circles out of felt – large enough to accommodate the pieces that I planned to glue in place, but small enough to be hidden from view.

I cut two small slits in one circle to serve as my slide.


I believe a better technique would be to make two small buttonholes, side-by-side, to reinforce the fabric. I will be doing this on subsequent pieces.

I glued the ruffle and flowers to the circle without the slits. It’s important to do this first so that you know how to line up your slide piece on the backside.

I then glued the slide circle to the back around the circumference. You could stitch around the edges if you prefer.

That’s it! It’s super simple, but think of all of the fun possibilities.

Here’s how the piece would fit on a barrette or a pin.


But here is how I plan to wear it.


{I would recommend a headband with teeth. They secure the felt in place.}


I love the rough, frayed edges!

Here’s another that I whipped up with yo-yos.


I would love to make a bunch of these to give as gifts. Do you like to receive handmade gifts? I am always so touched when someone makes something for me. It’s a gesture that really says, “I was thinking about you.”

Do you think that most people feel the same way? Or is it just kindred spirits like us who enjoy expressions of creativity?

Hope your week is off to a good start, my friends! Thank you for stopping by!
Before explaining myself, let me give you the backstory…

Once upon a time, Fabric.com used to host massive warehouse sales. And they were AWESOME! We’d head up to Atlanta, stand in line among the other textile addicts, and once the doors opened, it was mayhem! Every woman for herself!

My favorite tables were the remnants. You could purchase by the pound. I would dig through all of the amazing fabrics and pull out anything that looked remotely interesting. I would come home with garbage bags full of fabric!

At the last sale, I came home with a yard and a half of this:


And it’s been sitting, forgotten, in my stash for nearly two years now. As I was unpacking my boxes, I started pulling out yardage that I could use for garment patterns. For some reason, this fabric said, “Turn me into a skirt!”

So, I did.


As I was cutting my pattern pieces (Cynthia Rowley, Simplicity 2512), I read the information on the selvage. The pattern name?

“Barnyard Friends”

Um, what? I couldn’t believe that I was making a skirt – to wear in public – out of a quilting fabric named “Barnyard Friends.”

It totally changed my impression of what I was looking at. But, I persevered and finished my first fall garment.


But, I ask you… do you think this is fashionably acceptable or have I crossed the line that convinces women that “Mom Jeans” are okay to wear? Have I lost touch?

While you’re mulling over your answer, please enjoy this classic SNL skit:


Whatcha think? Does it work? Or have I lost my better judgement?

Happy Friday, friends!

Voting for the Readers' Choice category of the Country Living Blue Ribbon Blogger Awards is still open! You can vote daily until September 15.

"Always a Project" is one of 3 blog finalists in the "Crafts" category. I would love to have your votes! But, I have to say, the other 2 finalists are pretty great. So, you can't go wrong with whoever you choose!

My weekend posts bring me joy all week long. I love to read your comments and chat back, which is why I will always respond to each and every comment.

Thanks for reading!
Here's a photo from a recent trip Denver with two of my favorite people, Megan and Kellie.


You've heard me gush a time or two about Megan, but let me tell you about Kellie {far right}. She is one of the best people I know. The most selfless, giving, caring person. Lovely in every way.

Seriously. I’m her biggest fan.

I was so excited when she asked me to help her with a few sewing projects. It was a chance to do something for her! But then panic took over… She didn’t want me to do them for her. She wanted me to teach her how to make them herself.

I love to teach others what I know, but I’m admittedly not very good at it. I’m one of those instructors that start mid-thought, leaves out a few crucial steps along the way, and ultimately winds up just getting confused.

Yeah… it’s not one of my strengths.

So, several months ago, we tackled a duvet cover for her bed. It helped to set the stage for the rest of the room. And she learned a lot about handling a massive amount of fabric.


This week, we decided to carve out some time during our lunch hours to make a valance for the room.

I first started sewing with window treatments. Mathematically, they make sense to me. I can take a few measurements and sketch up exactly what I want to do.

Really, “sketch” is an artsy way to describe what I do. It’s actually more like chicken scratch.


But, hey, it works!

Click on the graphic below for a pattern that I drew up on my computer in case you’re interested in making the same treatment. I've factored in a 1/2" seam and a 1 1/2" hem at the bottom of the treatment into my measurements.


Beyond the fabric that we were using, all that was required was a 1” x 4” board, which was cut to the window width + 3”, and two 3” L-brackets.

After getting her off to a good start, I left Kellie to it and she did a great job assembling the piece. We didn’t line the treatment or really finish the edges {one technique at a time, right?}.


I helped her with her corner pleats, which we basted in place before tacking the treatment to the board.


I have a few inches over Kellie so I manned the power tools, but it definitely took both of us to get the treatment hung!


I think it was a hugely successful project, especially considering we did it during our lunch hours over 3 days! The yellow looks amazing against her lavender walls.

Let me know if you use the pattern or if you have any questions about the assembly. I can’t wait to see what you come up with!

I hope you're having a fantastic Labor Day weekend!
I’ve been working to finish setting up Ryder’s nursery {can I still call it that?} and, with every box I open, I’m so excited to be reintroduced to my past projects!

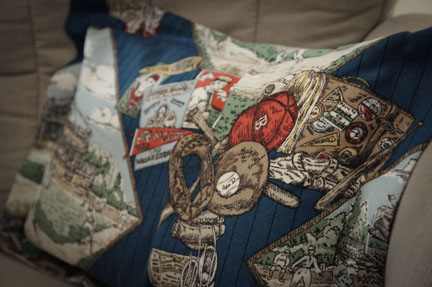
For both of my boys, I designed rooms that could grow with them. Dylan’s theme is vintage cowboys. Ryder’s is vintage baseball. At any point, I can make very small changes in their rooms to adjust to their ages or changes in preferences. It’s great!!

Let me give you a quick tour.

I started with a fabric that I loved and complemented it with a red ticking. I’ve long since retired the bumper, but the crib skirt will stick around for a while. I actually have enough of these fabrics to make a cute duvet for his toddler bed.


{Don’t you know the only time I can get a decent photo of my child is when I’m trying to take a photo of something else?!}

Rather than making custom treatments for his room, I purchased navy tab-top curtains and added bands of the main fabric.


I found these really great vintage penny-punch cards on eBay. They were a GREAT find {and in mint condition}! I slapped them in floating frames and… Voila! Instant art!


I purchased this dresser for $35 at an antique store. I stripped and stained the piece a dark brown and applied a crackle finish in a navy blue over the stain. I also swapped out the pulls. I LOVE the results!


I used scraps to make a fabric bunting and a few throw pillows.


I love maximum impact on a minimum budget. Don’t we all?!

Please come back tomorrow! I want to share a window treatment project that I’ve been helping a friend with this week – during our lunch hours! Gotta squeeze in the creative time whenever you can!
Have you played this before? It's so much fun what you can learn about each other through this game. And it's probably best played while sober. Just sayin'.

So here goes... my two truths and a lie...


I am a karaoke champion, which makes me a total hit at bars and parties.


I've danced on stage with the band, Survivor, to "Eye of the Tiger."


My blog is a finalist in the Blue Ribbon Blogger Awards hosted by Country Living magazine.

Which is the lie?

Number 1! I've never done karaoke in public.

Which means that Number 3 is a truth! Oh my goodness! Somebody has looked at my sweet little blog!

I'm over-the-top excited about being a finalist in the competition. The sites are being judged this week so the winners will know the outcome very soon. There is also a Reader's Choice Award part of the competition and I would love to have your support.

If you enjoy my blog, I'd be honored and humbled if you would cast your vote for my site under the "Crafts" {yes, I know what you're thinking. I do. I know.} category. Just click here and you'll find the link to vote!

I'm really in shock over all of this. 

Thank you so much for visiting and coming back. Writing my weekly posts has been a very fulfilling part of these past 9 months. I can't wait for more to come!