I cannot tell you how blessed I was last night to spend time with my oldest son... crafting!

He purchased a "super cool" bracelet while we were out and about yesterday. He was so inspired by it that he came home and wanted to learn how to make it himself!


So, he went straight to "ha yoo"... "ya woo"... "yoo hoo"...

"What's it called, mommy?"

"Um... Google."

He found a great tutorial on YouTube for weaving "Survival Bracelets," which is a military-inspired technique, and that's what we did last night!

I started him out with craft lace because that's what we had available. I used some cotton cording that I had left over from a sewing project.

{As always... YAY for making something new out of something old!!!}

We had such a good time with it once we finally got going!


Check out how intently he's working on his project.


Totally precious.

Here are the results!


Of course, I had to get fancy-schmancy with mine and added a humongous button closure. I have to say - I would actually wear this out. Pinterest tells me that rope is fashion-current these days.


**smile**

So, here's the best part of our crafting adventure...

He wants to incorporate this activity into his birthday camp-out! What a fantastic creative project for little boys!

It's appropriate that they are called "Survival Bracelets" because I have been stressing over how to survive a house full of little boys!

I found this awesome pack of paracords for the boys to use.


Very masculine, n'est pas?

I love it when so many things come together in the perfect way!

I'll be honest.

I'm just not creative enough to be a scrap-booker. I humbly bow in the presence of those who are.

I gave it a good effort several years ago, but I just have no vision for how a page should be put together. I just sit there and stare at it.

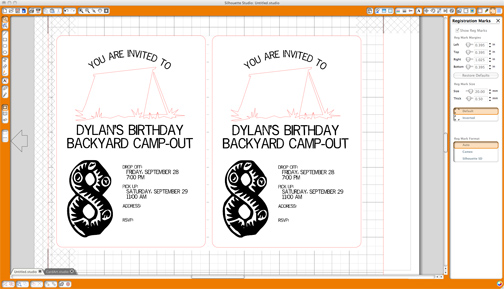
I have a Silhouette that I've primarily used for fabric and vinyl cutting. But today, I used it to make creative birthday party invitations for my son.

And it was... So. Much. Fun!

I won't give you a play-by-play because the pics tell the story, but if you'd like some resources:

Fonts: Pinewood, Reprise Stamp
Art: Silhouette Online Store
Silhouette Print and Cut Tutorial


Dylan added the final touches by decorating the envelopes for his friends.


These didn't require the talent it takes to be a scrap-booker, but I'm proud of the way my paper crafting project came together.

Now, I'm off to plan the party!


We spent the holiday weekend camping.

Well, glamping, really.

I mean, can you really count enjoying television, air conditioning, refrigeration, and a microwave as camping?

**big grin**

I can tell you that I spent the weekend roughin' it with a cranky two-year-old!

Allow me to interpret...

"Why can't I climb the dangerous pile of rocks?"


"Why are you watching me eat my ice cream?!"


"Why does my snack keep falling off of my spoon?"


"I don't want a picture!"


"I don't want a picture!!!!!!!"


Whew! What grumpy little guy! I'm hoping we can turn that frown upside down by the time he turns three.

Greetings, friends! And happy Monday!

I just loved reading all of the comments that you left on my iPad cover tutorial. It never gets old to read about your ideas and inspiration.

You all seemed excited about the project, which got me even more excited about the project... so, I decided to give away THREE sets of materials.

The Random Number Generator, located at random.org, selected the following lovely ladies to receive a sweet little package of oilcloth:

Tina Howell
Kymmie M.
Beth Wulff

Congrats! I'm contacting each of you now via e-mail.

Happy sewing!

I've had "Complete my oilcloth iPad cover" on my monthly list of to-do's for some time now. I have the "standard issue" cover that my office provided to me, but it is lacking a few features. I needed something that could carry the keycard to my office, a notepad (because sometimes you actually need to write something), and a place to keep a pen.


You should know that most of my projects are born from trial and error and this one was no exception. I made a couple of mock-ups that just didn't work.

Yeah. I don't have any pictures of those.

Here are all of the materials that I needed. I'll describe them better as I go along.


By the way, I'm giving the above materials away so you can make a case for yourself! Keep on reading to learn more.

I first cut two pieces of checkered oilcloth (9" x 10 1/2") to serve as my front and back panels.

I then created my piping. I cut a 30" piece of 1/4" cotton cording and a 32" x 1 1/2" piece of oilcloth. Using a zipper foot, I basted along the length of the oilcloth to contain the cotton cording.


I cut a contrasting piece of oilcloth (9" x 8") to serve as my large exterior pocket. I added a 1/2" hem to the top edge and trimmed it out with a simple grosgrain ribbon.


To form the card pocket (which also fits an iPhone!), I cut a small piece of oilcloth (3 1/2" x 3") and added a little ribbon detail to the top of the block.


I attached the card pocket to the lower right-hand of the exterior pocket by using a satin stitch. If your machine doesn't have a satin stitch option, you may also accomplish this look by setting the width of your zigzag stitch to its shortest option. I only stitched the left side of the pocket, leaving all other sides free.


Next, I added the pen loop. I cut a piece of oilcloth (3" x 1"), folded it in half, and stitched it just below the ribbon detail of the exterior pocket.


My next step was to baste the exterior pocket to the front side of the cover, using a 1/4" hem.


I attached the piping to the backside of the cover, using a zipper foot and a basting stitch.


Frontside and backside are ready to go!


Right sides together, I stitched a 1/2" seam around the edges (still using the zipper foot!).


Turned it right-side out.


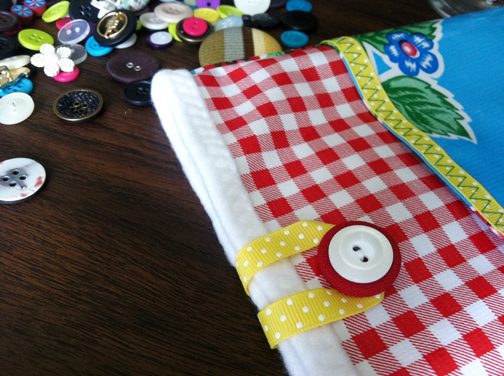
I stitched a ribbon loop to the right side of the back panel. The length of this ribbon will depend on the size of the button that you use. My length was 6".


I folded the length of my fleece in half (16 1/2" x 10 1/2" folded to 8 1/4" x 10 1/2") and stitched the long edge together with a 1/4" seam.


I inserted the exterior shell into the fleece liner - right sides together - and stitched a 1/2" seam around the top of the case.


I pulled the fleece lining up and tucked it into the exterior shell.


I added a zigzag stitch around the top of the bag and added my button.


And, that's it! I elected to leave the bottom of fleece lining open, unstitched, and it worked out beautifully!


It's so cute and kinda funky - the essence of oilcloth.

Strike this project off of the list!!

**smile**

Want to make your own? I'll provide you with the materials you need to make it happen. Leave me a comment below and I'll select a winner next Sunday (at random, of course) to receive the pretty package of materials pictured at the beginning of the post.

Happy sewing!!