


And these pictures don't do them justice. The first pillow is not as lumpy as it appears here.
By the way, I started this project days ago to share with you, but someone was seriously competing for my attention.

He's pretty dramatic. :)
The first pillow is inspired by this Pinterest find:

Kristen from whoswatchingthebaby.com has a great tutorial for achieving this look with a quilter's jelly roll. You should check out her great interpretation!
Here's how I achieved mine.
{Pillow #1}
For the smaller pillow, you'll need:
2 pieces of coordinating fabric, 9.5" x 19"
3 yards of wide ribbon
Batting
Cut five 9.5" of ribbon, space them evenly across, and pin them to the fabric for the front of your pillow.

{I found this cotton trim on the clearance rack at Hancock for $1 a yard! I love a bargain!}
Sew a seam directly down the middle of each strip in a coordinating color.
Fold each ribbon so that the edges met in the middle and pin in place at 4.75".

Using your pin as a marker, sew a tight zig-zag stitch, starting approximately 1/4" above the pin, and finish approximately 1/4" below the pin. This stitch should be wide enough to join your ribbon edges together.
Be sure to use a locking stitch when you finish so that the threads will not pull loose.

Open and flatten the ribbon edges on both sides (and both ends) and stitch a zig-zag seam approximately 3" from the edge of the pillow towards the center of each strip.
Again, be sure to finish with a locking stitch so the threads will not pull loose.

Do this for all five strips.
Now, I'll step in with Pillow #2 to explain how to achieve the modern "ruffle."
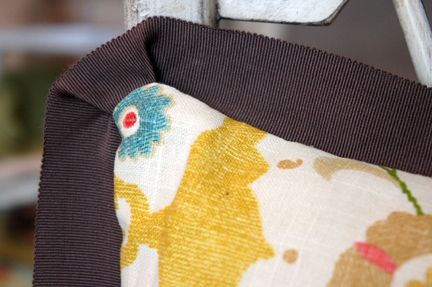

When you get to a corner, fold the ribbon this way:


This is how the ribbon should look when it is pinned completely around the pillow.


Run a basting stitch 1/2" from the edge of the pillow to secure the ribbon to the fabric.
Then, pin the front of the pillow to the back of the pillow with right sides together and stitch together with a 1/2" seam.
Be sure to leave room open to add your batting or pillow insert. I used batting for the smaller pillow and a 18" form for the larger.
Clip your corners close to the seam to reduce bulk. Turn right side out and stuff!

I would recommend closing your pillow with a slipstitch because it looks nicer, but if you have a zipper foot, you could run a seam to close your pillow.
And that's it!
I hope that you find some of that helpful or inspiring. I absolutely love the ribbon detail. It is so simple, but so pretty!


